UW-Stout/UV Light SP22
Contents
Introduction
We will be stressing multiple strains of yeast cells with UV light exposure
Materials
- Phosphate Buffered Saline (PBS)
- Growth Media (Agarose)
- Yeast Strains, Knockouts and Wild Type
Equipment
- P-1000 Micro-pipette
- P-20 Micro-pipette
- Bachur & Associates Santa Clara, CA 95050 Model LS-100-3 UV Light Exposure System (400 Watts)
- Incubator set to 30°C
- Fine Tip Sharpie
- 60mm Culture Dish
- SHAKER THINGY
Calibration Protocol
Safety Note: When conducting any experiment its important to wear the proper PPE for yourself as well as to protect your experiments in our lab we wore a lab coat and gloves. While we were in our clean room doing the UV Light Exposure we wore additional equipment including: hair nets, coverall top, boot covers and gloves.
Calibration Experiment 1
- In our First calibration experiment we conducted UV light exposer based on time, the intervals we used are as follows: 1 second, 3 seconds
5 seconds, 10 seconds, 20 seconds, 50 seconds, 100 seconds, 200 seconds, 500 seconds and 1000 seconds respectively.
- Calculate the amount of pure cell culture and amount of PBS in order to get 1000 cells per mL
- Using a P-20 Micropipette, pipette the amount of cell culture needed into a 1.5mL micropipette tube.
- Using a P-1000 Micropipette, pipette the amount of PBS calculated into the same micropipette tube as step 2
- Mix the PBS and cell culture either by hand or by using a NAME OF THING HERE
- Pipette 100uL of the PBS and cell mixture into each 60 mm cell culture plate with agarose in it.
- Turn on the UV Light, set it to 400 Watts
- Label cell culture with interval time (1 Second, 2 Seconds, etc.)
- Remove top off cell culture plate
- Expose the single cell plate for designated time under the UV Light
- Repeat Steps 7-9 until out of plate and intervals.
Calibration Experiment 2
- Due to the RESULTS OF CALIBRATION 1 the time gaps left use needing to do another experiment to test the time between 500 seconds and 1000 seconds. We did new time intervals of 550 seconds, 600 seconds, 650 seconds, 700 seconds, 750 seconds, 800 seconds, 850 seconds and 950 seconds.
- Calculate the amount of pure cell culture and amount of PBS in order to get 1000 cells per mL
- Using a P-20 Micropipette, pipette the amount of cell culture needed into a 1.5mL micropipette tube.
- Using a P-1000 Micropipette, pipette the amount of PBS calculated into the same micropipette tube as step 2
- Mix the PBS and cell culture either by hand or by using a NAME OF THING HERE
- Pipette 100uL of the PBS and cell mixture into each 60 mm cell culture plate with agarose in it.
- Turn on the UV Light, set it to 400 Watts
- Label cell culture with interval time (550 Seconds,600 Seconds, etc.)
- Remove top off cell culture plate
- Expose the single cell plate for designated time under the UV Light
- Repeat Steps 7-9 until out of plate and intervals.
Calibration Results
Calibration Experiment 1 Results
ADD PHOTOS OF 1secound 500 second and 1000 second photos
Interpretation
We found that the experiment we conducted was inconclusive. The 500 Second plate had too many yeast cells for us to count and make an accurate count and the 1000 second plate didn't have any yeast colony's on it, we concluded that the the 50% kill 50% live point must be between the 500 second mark and the 1000 second mark.
Calibration Experiment 2 Results
- Results
- Pilot Experiment April 19, 2022
- 550 seconds = 483 colonies
- 600 seconds = 279 colonies
- 650 seconds = 198 colonies
- 700 seconds = 40 colonies
- 750 seconds = 54 colonies
- 800seconds = 13 colonies
- 850 seconds = 4 colonies
- 900 seconds = 2 colonies
- 950 seconds = 1 colony
Knock-out Protocol
- Wear Proper PPE when handling Yeast Cells, avoid direct exposure to UV light, and wear safety glasses if needed.
- Fill 7 1.5ml centrifuge tubes with 9,990ul of PBS.
- Vortex each yeast stock to resuspend the yeast cells. (wild and 6 knock-out strains)
- Pipette 10ul of each individual yeast stock into one of the centrifuge tubes containing 9,990ul of PBS to create a dilution containing 2 yeast cells per microliter for each strain. Make sure to label each tube, so the strains don't get mixed up.
- Vortex each dilution and prepare 14 plates to total, two for each yeast strain with 50ul of the yeast dilution for about 100 yeast cells per plate.
- Label 7 plates with 0 and the other 7 plates with 600 for the number of seconds each plate will be exposed to the UV light. Also, label what yeast strain is in each plate. There should be a 0 plate and 600 plates for each strain.
- Set up the UV light exposure system:
- 400 watts
- 600 Seconds
- Run yeast plates (without plate top) under the UV light for their respective times in seconds.
- Place plates upside down in a dark incubator set to 30°C for 48 hours.
- Count the number of colonies on each plate using the 0-second plate as your control to compare to. Based on how many colonies there are on each plate, determine if the knocked-out gene of the yeast had any effect on the survival of the yeast cells (improved/reduced survival).
- Repeat the procedure above as needed to acquire the data required.
Knock-out Results
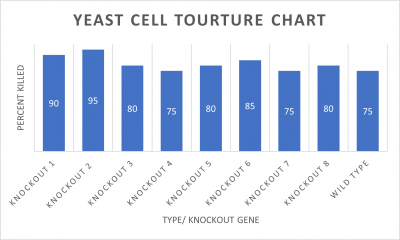
- Knock-out Strain 1:YDL109C
- Knock-out Strain 2:YGL146C
- Knock-out Strain 3:YOR111W
- Knock-out Strain 4:YHL029C
- Knock-out Strain 5:YDR307W
- Knock-out Strain 6:YNL058C
- Knock-out Strain 7:YCL049C
- Knock-out Strain 8:YGR079W
Wild type
Results:
- Experiment 1
- 0sec = 24 colonies
- 600sec = 58 colonies
- Experiment 2
- 0sec = 95 colonies
- 600sec = 92 colonies
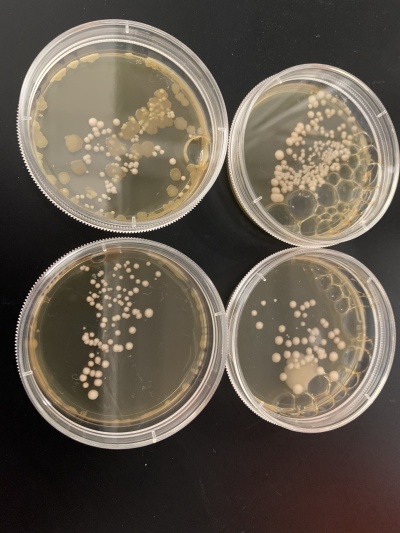
Interpretation: The two 0sec plates are on top, and the 600sec plates are on the bottom. I believe something went wrong with the wild strain run. The 0sec plat had fewer than the plate exposed to the UV light for 600sec, and the second run didn't seem to be affected much by the UV light. I guess that the number of cells each plate had, in the beginning, was significantly different, making it hard for this data to be used reliably.
Photos
- https://photos.app.goo.gl/MHK9qHdCcy15Z5JF8
- YGL146C
- 1 second
- 60 seconds

