UW-Stout/UV Light SP22
Contents
Introduction
We will be stressing multiple strains of yeast cells with UV light exposure. Using the following calibration protocol and knockout gene protocol.
Materials
- Phosphate Buffered Saline (PBS)
- Growth Media (Agarose)
- Yeast Strains, Knockouts, and Wild Type
Equipment
- P-1000 Micropipette
- P-10 Micropipette
- Bachur & Associates Santa Clara, CA 95050 Model LS-100-3 UV Light Exposure System set at 400 Watts
- Incubator set to 30°C
- Fine Tip Sharpie
- 60mm Culture Dish
- Vortexer
- Gloves
- Hair Net
- Coverall Top
- Boot Covers
Calibration Protocol
Safety Note: When conducting any experiment it's important to wear the proper PPE for yourself as well as to protect your experiments in our lab we wore a lab coat and gloves. While we were in our cleanroom doing the UV Light Exposure we wore additional equipment including hair nets, coverall top, boot covers, and gloves.
Calibration Experiment 1
In our First calibration experiment, we conducted UV light exposure based on time, the intervals we used are as follows: 1 second, 3 seconds 5 seconds, 10 seconds, 20 seconds, 50 seconds, 100 seconds, 200 seconds, 500 seconds, and 1000 seconds.
- Calculate the amount of pure cell culture and amount of PBS in order to get 1000 cells per mL
- Using a P-10 Micropipette, pipette the amount of cell culture needed into a 1.5mL micropipette tube.
- Using a P-1000 Micropipette, pipette the amount of PBS calculated into the same micropipette tube as step 2
- Mix the PBS and cell culture either by hand or by using a Vortexer
- Pipette 100uL of the PBS and cell mixture into each 60 mm cell culture plate with agarose in it.
- Add Glass beads and shake for 30 seconds, then remove glass beads
- Turn on the UV Light, set it to 400 Watts
- Label cell culture with interval time (1 Second, 2 Seconds, etc.)
- Remove the top off of the cell culture plate
- Expose the single-cell plate for the designated time under the UV Light
- Repeat Steps 8-10 until out of intervals.
- Place cell culture plate in 30 degrees C incubator for 48 hours
- See Results
Calibration Experiment 2
Due to the results of calibration 1, the time gaps left us needing to do another experiment to test the time between 500 seconds and 1000 seconds. We did new time intervals of 550 seconds, 600 seconds, 650 seconds, 700 seconds, 750 seconds, 800 seconds, 850 seconds, and 950 seconds.
- Calculate the amount of pure cell culture and amount of PBS in order to get 1000 cells per mL
- Using a P-10 Micropipette, pipette the amount of cell culture needed into a 1.5mL micropipette tube.
- Using a P-1000 Micropipette, pipette the amount of PBS calculated into the same micropipette tube as step 2
- Mix the PBS and cell culture either by hand or by using a vortexer
- Pipette 100uL of the PBS and cell mixture into each 60 mm cell culture plate with agarose in it.
- Add Glass beads and shake for 30 seconds, then remove glass beads
- Turn on the UV Light, set it to 400 Watts
- Label cell culture with interval time (550 Seconds,600 Seconds, etc.)
- Remove the top off of the cell culture plate
- Expose the single-cell plate for a designated time under the UV Light
- Repeat Steps 8-10 until out of intervals.
- Place cell culture plate in 30 degrees C incubator for 48 hours
- See Results
Calibration Results
Calibration Experiment 1 Results
Results
1 Second
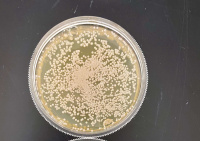 500 Seconds
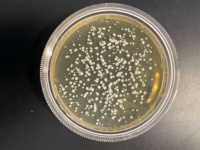 1000 Seconds
Interpretation
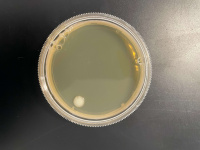
We found that the experiment we conducted was inconclusive. The 500 Second plate had too many yeast cells for us to count and make an accurate count and the 1000-second plate didn't have any yeast colony's on it, we concluded that the point we want must be between the 500-second mark and the 1000 second mark.
Calibration Experiment 2 Results
Results
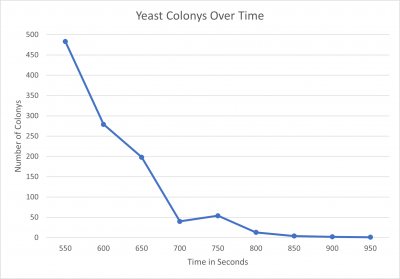
- 550 seconds = 483 colonies
- 600 seconds = 279 colonies
- 650 seconds = 198 colonies
- 700 seconds = 40 colonies
- 750 seconds = 54 colonies
- 800seconds = 13 colonies
- 850 seconds = 4 colonies
- 900 seconds = 2 colonies
- 950 seconds = 1 colony
Interpretation We found that the point we were looking for was at the 600-second mark, with this in mind this will be the amount of time we will use in the knockout protocol.
Knock-out Protocol
Safety Note: When conducting any experiment, it's essential to wear the proper PPE for yourself and protect your experiments. In our lab, we wore lab coats and gloves. While we were in our cleanroom doing the UV Light Exposure, we wore additional equipment, including hairnets, coverall top, boot covers, and gloves.
- Calculate the amount of pure cell culture and amount of PBS in order to get 200 cells per mL
- Using a P-10 Micropipette, pipette the amount of cell culture needed into a 1.5mL micropipette tube.
- Using a P-1000 Micropipette, pipette the amount of PBS calculated into the same micropipette tube as step 2
- Mix the PBS and cell culture either by hand or by using a vortexer
- Pipette the full 500uL of the PBS and cell mixture into each 60 mm cell culture plate with agarose in it.
- Pipette the full 500uL of the PBS and cell mixture into each 60 mm cell culture plate with agarose in it. This one will not be exposed to UV light and will be designated as the control
- Add Glass beads and shake for 30 seconds, then remove glass beads
- Label cell culture with the Gene Number
- Turn on the UV Light, set it to 400 Watts
- Remove the top off of the cell culture plate
- Expose the single-cell plate for 600 seconds under the UV light, keeping the control away from the light
- Repeat Steps 8-10 until finished
- Place cell culture plate in 30 degrees C incubator for 48 hours
- See Results
Knock-out Results
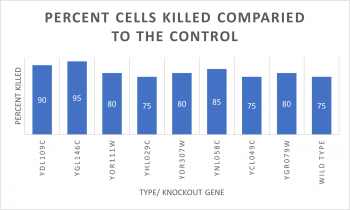
- Knock-out Strain Wild Type
- Knock-out Strain 1:YDL109C
- Knock-out Strain 2:YGL146C
- Knock-out Strain 3:YOR111W
- Knock-out Strain 4:YHL029C
- Knock-out Strain 5:YDR307W
- Knock-out Strain 6:YNL058C
- Knock-out Strain 7:YCL049C
- Knock-out Strain 8:YGR079W
