UW-Stout/Bases SP23
Contents
Pilot Experiment
Introduction
The goal of the experiment is to find a pH level of ammonium hydroxide and ammonium chloride buffer that upsets our yeast but does not kill them. The pH levels range from 8 to 10.5 increasing in .5 increments and then recording the effects on the growth at each level.
Materials
- Ammonium Chloride
- Ammonium Hydroxide
- Corning COSTAR 96-well clear flat-bottom assay plate
- microcentrifuge tubes
- micropipette and corresponding tips
- p20
- p100
- p1000
- pH reader
- wild-type yeast in 2x synthesis complete media at an OD600 of 0.1-0.2
- 15 mL conical tubes (x6)
- 20 mL sterile water
Procedure
Make basic buffers using the ammonium chloride and ammonium hydroxide
- add small increments of the ammonium hydroxide into the ammonium chloride while using the pH reader until you reach pH level of 10.5
- pour buffer into a labeled conical tube
- repeat step 1 and 2 until you have made each pH level
- 8 8.5 9 9.5 10 10.5
- once buffers are made they can be stored at room temperature
this portion of the experiment is done in a sterile environment like a biosafety cabinet
MAKE SURE TO VORTEX YEAST CELLS BEFORE ADDING TO MICROCENTRIFUGE TUBES
- in a labeled microcentrifuge tube add
- 50 ul yeast culture
- 40 ul sterile water
- 10 ul of pH level 8 buffer
- repeat step above using each pH level
- for the control in a labeled microcentrifuge tube add
- 50 ul sterile water
- 50 ul yeast culture
- vortex each tube
- pipette 100ul of each concentration into a well
- make sure to record which pH level is in each well
- set up plate reader
- temperature 30 degrees Celsius
- mode kinetic
- wavelength 600 nm
- interval 5 minutes
- total run time 24 hours
- shake before read 30 seconds
- transfer assay plate into reader and read for 24 hours
Data Recording
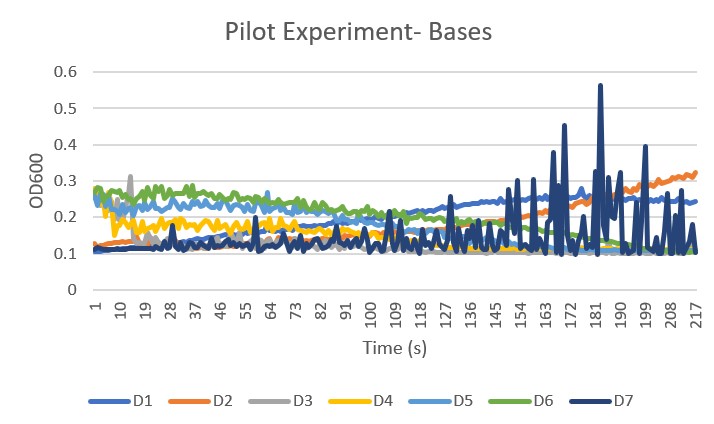
Pilot Trial 3 Bases Graph
- D1 is the pH level 8
- D2 is the pH level 8.5
- D3 is the pH level 9
- D4 is the pH level 9.5
- D5 is the pH level 10
- D6 is the pH level 10.5
- D7 is the wild type control group no buffer added
Analysis The control group, D7, gave an unclear and unreliable growth curve to compare the pH levels to. These results happened multiple times in multiple trials we have chosen to continue on using the other data sets, but keeping in mind that the control is unreliable. The pH levels 9 through 10.5 proved to be too basic and killed the yeast and the pH 8 showed less growth than pH 8.5. Line D2, which was pH 8.5 showed the best growth, therefore it was chosen to be the buffer in our Final Experiment.
Final Experiment
Introduction
The purpose of our pilot experiment was to find a pH level of ammonium chloride and ammonium hydroxide buffer that did not kill the yeast, but disturbed their growth. Based on the data the pH level 8.5 showed change in growth patterns but did not kill the yeast. In this experiment three different strains of yeast that have been genetically altered along with a wild type yeast as a control group will be mixed with the pH level 8.5 buffer and sterile water to observe their growth patterns. The purpose is to see if the knockout genes are beneficial or detrimental to the basic environment.
Materials
- ammonium chloride and ammonium hydroxide buffer at pH level 8.5
- Corning COSTAR 96-well clear flat-bottom assay plate
- microcentrifuge tubes
- micropipette and corresponding tips
- p20
- p100
- p1000
- pH reader
- yeast strain 1 YMR144W
- yeast strain 2 SSK1
- yeast strain 3 YKL162C
- wild-type yeast BY4735
- 20 mL sterile water
Procedure
this portion of the experiment is done in a sterile environment like a biosafety cabinet
MAKE SURE TO VORTEX YEAST CELLS BEFORE ADDING TO MICROCENTRIFUGE TUBES
- in a labeled microcentrifuge tube add
- 50 ul yeast strain 1
- 40 ul sterile water
- 10 ul of pH level 8.5 buffer
- repeat step above with yeast strain 1 for a total of three samples
- vortex each tube
- pipette 100ul of each sample into a well
- make sure to record which yeast strain sample is in each well
- in a labeled microcentrifuge tube add
- 50 ul yeast strain 2
- 40 ul sterile water
- 10 ul of pH level 8.5 buffer
- repeat step above with yeast strain 2 for a total of three samples
- vortex each tube
- pipette 100ul of each sample into a well
- make sure to record which yeast strain sample is in each well
- in a labeled microcentrifuge tube add
- 50 ul yeast strain 3
- 40 ul sterile water
- 10 ul of pH level 8.5 buffer
- repeat step above with yeast strain 3 for a total of three samples
- vortex each tube
- pipette 100ul of each sample into a well
- make sure to record which yeast strain sample is in each well
- in a labeled microcentrifuge tube add
- 50 ul wild type yeast
- 40 ul sterile water
- 10 ul of pH level 8.5 buffer
- repeat step above with wild type yeast for a total of three samples
- vortex each tube
- pipette 100ul of each sample into a well
- make sure to record which yeast strain sample is in each well
- set up plate reader
- temperature 30 degrees Celsius
- mode kinetic
- wavelength 600 nm
- interval 5 minutes
- total run time 24 hours
- shake before read 30 seconds
- transfer assay plate into reader and read for 24 hours
